
馬上就要過年了,最近在整理物品的時候,突然找到一年前為了玩板子而亂買的 Grove sensor,回想當時雖然對於韌體很感興趣,不過由於工作關係,因此把大部分進修時間都花在 Web 議題,沒能完成 sensor 韌體,留下一個遺憾。而既然這次被我找出來,近期工作又是都以 FPGA 板子居多,對於相關概念已有基本認知,覺得是時候把它實作出來,了結一年前給自己的課題。
硬體
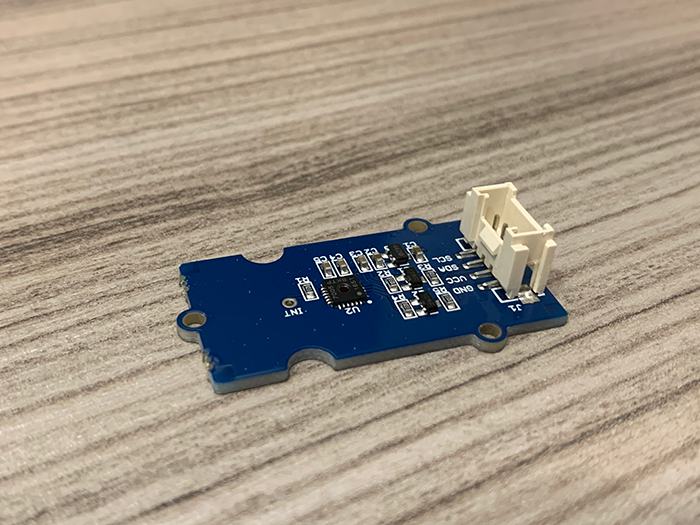
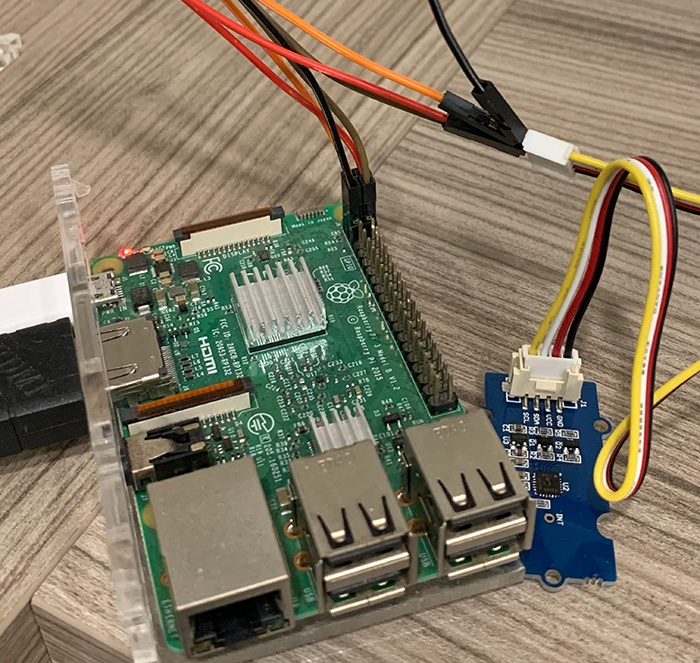
- Grove Temperature&Humidity Sensor (High-Accuracy & Mini)
- Raspberry Pi 3 Model B (Linux kernel 5.4.x)
技術
- I2C linux driver
- linux Industrial I/O subsystem
- device tree
由於買的 sensor 有支援 I2C bus protocol,因此這次實作的 driver 就會基於 I2C driver 架構上實作。搭配 iio (Industrial I/O) subsystem 來讓 user space 能夠透過 file system 來讀取溫度和濕度。
Overview
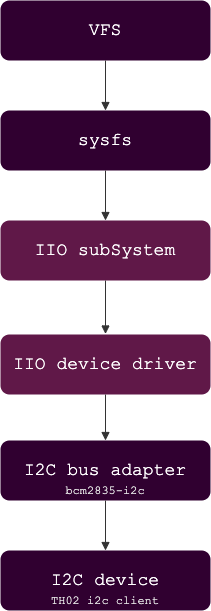
首先來看概略運作流程: application 透過 sysfs 與 industrial I/O device 進行互動,在 iio device driver 接收到 read 指令後,將對應的操作行為藉由 I2C bus adapter 與 I2C device 進行溝通。
其中我們需要實作的部分包含:
- Th02 device
- Th02 device driver
- iio device driver
之所以採用 Industrial I/O subsystem,是因為此 framework 提供便利的機制,在註冊 iio device driver 後,會根據設定在 file system 中生成代表各 sensor info 的 file node,如此一來就可以藉由常見的寫入、讀取行為來操作 sensor (當然也不只有 iio subsystem 能夠實現這機制,也可以透過其他方法實現)。
Th02 Device
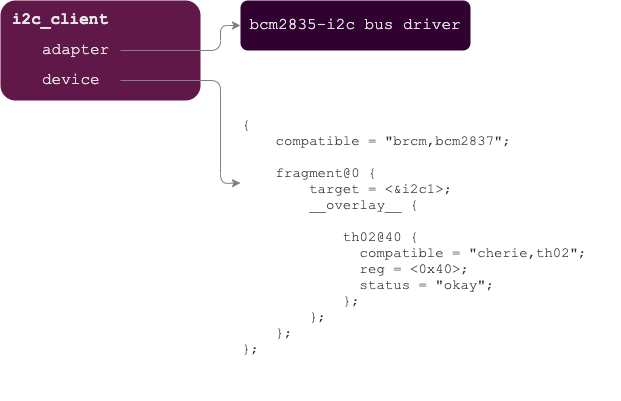
Device 和 device driver 是相生相依的關係,但 I2C device 無法像 PCI or USB device 一樣在 runtime 時被主動 detect 且生成對應之 device instance,因此我們需要透過外在方式來產生(How to instantiate I2C devices)。
本次實作中是使用 device tree overlays 機制來宣告 Th02 device tree node,並透過 dynamic loading 方式來註冊 device。
 1/dts-v1/;
 2/plugin/;
 3
 4/ {
 5    compatible = "brcm,bcm2837";
 6
 7    fragment@0 {
 8        target = <&i2c1>;
 9        __overlay__ {
10
11            th02@40 {
12              compatible = "cherie,th02";
13              reg = <0x40>;
14              status = "okay";
15            };
16        };
17    };
18};
本次實作使用 Raspi 3B 板子,其中有兩組 I2C BUS:i2c0 for GPU (GPIO 0, GPIO 1) 和 i2c1 for CPU (GPIO 2, GPIO 3),一般 i2c sensor 設備使用 i2c1 bus 即可。
而代表 I2C device 的抽象結構,在 linux kernel 正式名稱叫做 i2c_client:
 1struct i2c_client {
 2	unsigned short flags;		/* div., see below		*/
 3#define I2C_CLIENT_PEC		0x04	/* Use Packet Error Checking */
 4#define I2C_CLIENT_TEN		0x10	/* we have a ten bit chip address */
 5					/* Must equal I2C_M_TEN below */
 6#define I2C_CLIENT_SLAVE	0x20	/* we are the slave */
 7#define I2C_CLIENT_HOST_NOTIFY	0x40	/* We want to use I2C host notify */
 8#define I2C_CLIENT_WAKE		0x80	/* for board_info; true iff can wake */
 9#define I2C_CLIENT_SCCB		0x9000	/* Use Omnivision SCCB protocol */
10					/* Must match I2C_M_STOP|IGNORE_NAK */
11
12	unsigned short addr;		/* chip address - NOTE: 7bit	*/
13					/* addresses are stored in the	*/
14					/* _LOWER_ 7 bits		*/
15	char name[I2C_NAME_SIZE];
16	struct i2c_adapter *adapter;	/* the adapter we sit on	*/
17	struct device dev;		/* the device structure		*/
18	int init_irq;			/* irq set at initialization	*/
19	int irq;			/* irq issued by device		*/
20	struct list_head detected;
21#if IS_ENABLED(CONFIG_I2C_SLAVE)
22	i2c_slave_cb_t slave_cb;	/* callback for slave mode	*/
23#endif
24};
可以看到其 structure 包含 adapter (I2C bus) 和 general device struct。以 Th02 sensor 為例,i2c_client 就是 Th02 sensor 的抽象設備層,其中 sensor 接在 I2C1 bus 上,此 bus 在 raspi 3B 是指 bcm2835-i2c bus driver。另外,我們所撰寫的 device tree node 描述則會在 struct device。
Th02 Device Driver
註冊好 device,接下來就是實作 I2C device driver 來進行 I2C device initialization。Th02 device driver 最重要的職責就是在 I2C device initialization 階段生成 iio device driver,並且建立起 iio device driver 與 i2c client 的關聯,如此一來 iio device driver 就能針對指定 i2c client 下指令。
我們利用 device struct 的 private_data,將 i2c_client 放入 iio device driver 的 device private_data 中,即可在後續流程中使用。
1// custom struct th02_device
2struct iio_dev *th02_iio = devm_iio_device_alloc(&client->dev, sizeof(struct th02_device));
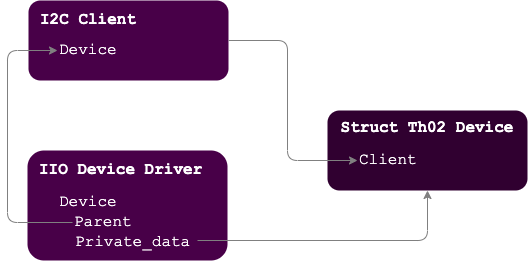
其中可以注意到,透過 devm_iio_device_alloc 生成 iio device driver(struct iio_dev), iio device driver 的 device->parent 會指向 I2C device,這意味著也可以使用 container_of 的方式來取得 i2c_client。
iio device driver
最後一個步驟就是實作 iio device driver,包含:
- 設定
iio_chan_spec,以讓 iio subSystem 來建立 file node 供 user space 操作 - 實作
iio_info.read_rawfunction
由於 Th02 sensor 只提供濕度和溫度的測量,因此設定為:
1static const struct iio_chan_spec th02_channels[] = {
2	{
3		.type = IIO_TEMP,
4		.info_mask_separate = BIT(IIO_CHAN_INFO_PROCESSED),
5	},
6  { .type = IIO_HUMIDITYRELATIVE,
7		.info_mask_separate = BIT(IIO_CHAN_INFO_PROCESSED),
8  }
9};
從 IIO_HUMIDITYRELATIVE 和 IIO_TEMP 就可以看到 iio system 將常見的測量類別都已定義好,對開發者來說相當方便。
再來就是根據 Th02 sensor document 來實作 iio_info.read_raw,完成讀取濕度、溫度等流程。以讀取溫度為例,其流程為:
- Set START (D0) and TEMP (D4) in CONFIG (register 0x03) to begin a new conversion, i.e., write CONFIG with 0x11
- Poll RDY (D0) in STATUS (register 0) until it is low (=0)
- Read the upper and lower bytes of the temperature value from DATAh and DATAl (registers 0x01 and 0x02)
Linux kernel 已有封裝好的 function i2c_master_send 與 i2c_master_recv 可供使用,因此搭配上面 document 流程就能夠透過 i2c bus protocol 下達正確指令。
以 read status 為例,要先寫入 Th02 STATUS address pointer,接著再進行 status value 的讀取。
1static int read_status(struct i2c_client *client, u8 *status)
2{
3 int ret;
4 u8 reg = TH02_STATUS;
5 ret = i2c_master_send(client, ®, 1);
6 if (ret < 0)
7 {
8 dev_err(&client->dev, "%s: failed to send data\n", __func__);
9 return ret;
10 }
11 ret = i2c_master_recv(client, status, 1);
12 if (ret < 0)
13 {
14 dev_err(&client->dev, "%s: failed to receive data\n", __func__);
15 return ret;
16 }
17
18 return 0;
19}
Source code
完整 source code 可以參考: https://github.com/YuShuanHsieh/th02_device_driver
已在 raspi 3B 板子上測試過,如果在使用時出現 error,可以看看 i2c bus 是否有 enable,並且是否有載入 industrialio module。
結論
老實說有蠻多內容想講的,包含 iio system、i2c structure 等。不過這幾個內容都相當龐大,如果都打出來怕有點偏離主題,因此只提及實作的部分,後續再來整理各細節。網路上可以找到相當多 Linux kernel 解析,不過看來看去其實蠻抽象的,希望用實際例子能讓這些抽象概念具現化,像是 i2c adapter ,如果根據板子深入研究,就可以發現實作 adapter 的 driver,如此一來就可以很清楚地了解實際是如何運作的。