閒聊
之前在辦活動的時候,得知有朋友在 follow 我的 Blog ,真是讓我非常訝異,因為我一直是默默撰寫文章,而且雖然我有參與 Golang 和 GDG 社群,但是我寫的內容很常都跟 Golang 和 Google 技術沒什麼太大關係 XD 非常感謝各位的觀看,之前有近兩個月都沒更新,感覺有點罪惡,以後會盡量定期更新的。
目前除了自修 CSE 506 課程之外,還有學習 RISC-V instruction 以及 pipeline,因為過往經驗都是看 x86_64 instruction 居多,現在改看 RISC-V 還蠻不習慣的。另外就是還想學用 Rust 寫 kernel module,目前趨勢是有些 Kernel developers 嘗試將 Rust code 結合進 Linux kernel 中,再加上 Rust 的發展也蠻成熟,是時候抽空來學習一下。
Lab 3 Exercise Part A - User Environments
Lab 3 是我認為蠻重要的一個實驗課程,主要學習 process 的 context 組成、context switch 流程,以及 interupt handlers 的註冊和運作過程。當然,JOS 中簡化了很多步驟,不過透過學習這些概念,再回去看 Linux kernel code 就會有更深的感觸。
而為了區別與 UNIX processes 的差異,在 JOS 中是使用 ENV(environment) 來代表 JOS 的 process 功能, JOS environment 也有 thread 和 address space,在實驗中我們會去實作這兩個概念。
User Environments
JOS 透過三個變數來管理 environments:
1struct Env *envs = NULL;                   /* All environments */
2struct Env *curenv = NULL;                 /* the current env */
3static struct Env *env_free_list;          /* Free environment list */
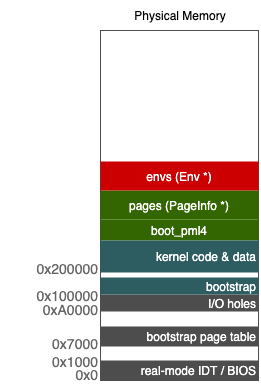
其中 envs 為 array 結構,在 kernel 初始化時就會分配 1024 個 Env 記憶體空間大小。curenv 就是目前正在使用的 Env,而我們透過 free list 來取得目前可供使用的 Env。因此,我們重新檢視目前的記憶體佔用狀況,其中有一區塊必須用來紀錄所有 Env 狀態。

接著,來觀察 Env 結構:
 1struct Env {
 2    struct Trapframe env_tf;	// Saved registers
 3    struct Env *env_link;   // Free list link pointers
 4    envid_t env_id;			// Unique environment identifier
 5    envid_t env_parent_id;		// env_id of this env's parent
 6    enum EnvType env_type;		// Indicates special system environments
 7    unsigned env_status;		// Status of the environment
 8    uint32_t env_runs;		// Number of times environment has run
 9
10    // Address space
11    pml4e_t *env_pml4e;		// Kernel virtual address of top-level page dir,
12    // or root of extended page tables in guest mode.
13    physaddr_t env_cr3;
14    uint8_t *elf;
15};
回顧作業系統的課程中所提到的觀念:
- 切換 process 的時候,會需要保存目前狀態,而
struct Trapframe env_tf就是用來儲存 registers 的數值 - 從 interrupt handler 回到指定的 process,依賴
env_id - fork process 時候會有 parent ID,則是
env_parent_id env_status紀錄當前 process 狀態,例如 running or runnable- 每個 process 有自己的 address space,則是紀錄在
env_pml4e和env_cr3
Create an envs array
有了概念之後,就先從 envs 實作起。首先分配 size 為 sizeof(struct Env) * NENV 的記憶體空間,接著把該記憶體區段 mapping 到指定的 virtual address UENVS,其權限為 kernel read, user read。(相關 functions 實作可參考 CSE 506 Lab2 - Memory Management and Virtual Memory Mapping)
1uint32_t env_size = sizeof(struct Env) * NENV;
2envs = boot_alloc(env_size);
3
4boot_map_region(boot_pml4e, UENVS, env_size, PADDR(env), PTE_U);
初始化 env,並且組成 env free list 供後續使用。
 1void
 2env_init(void)
 3{
 4	struct Env *last;
 5	last = env_free_list = &envs[0];
 6	envs[0].env_id = 0;
 7	for (int i = 1; i < NENV; i++) {
 8		envs[i].env_id = 0;
 9		last->env_link = &envs[i];
10		last = &envs[i];
11	}
12
13	// Per-CPU part of the initialization
14	env_init_percpu();
15}
Segment Register
觀察
env_init_percpu();,留意 segment register 的設定,在 Developer’s Manual: 3.4.2 Segment Selectors 中提到,segment register 紀錄 segment selector 的值,而 segment selector 前 2 個 bit 的值為Requested Privilege Level,因此 (GD_UD|3) 意味著 user level(applications)。其他 Level 可以參考 Developer’s Manual: 4.5 PRIVILEGE LEVELS。1asm volatile("movw %%ax,%%gs" :: "a" (GD_UD|3)); 2asm volatile("movw %%ax,%%fs" :: "a" (GD_UD|3));
Setup an address space for env
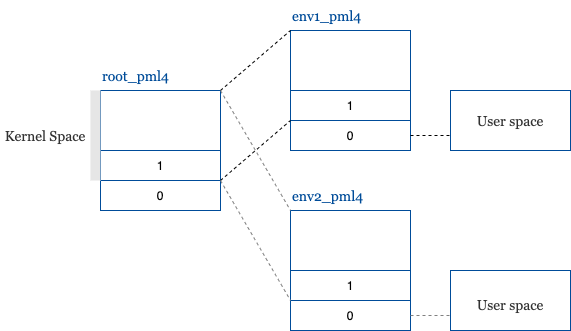
每個 env 會有自己獨立的 address space,而在 JOS 中是透過建立不同 pml4 page table 來達成目的。
其中要注意的地方是,env 的 pml4[0] 被設定為 user address space,而 pml4[1] - pml4[511] 則是 kernel address space,因此每個 env 的 pml4 1 - 511 entry 都會對應到相同的 kernel page table (boot_pml4),他們才能取得相同的資訊。而 pml4[0] 則是每個 env 都有自己的一個 table,並對應到不同的 physical memory address。

 1static int env_setup_vm(struct Env *e)
 2{
 3    int i;
 4    struct PageInfo *p = NULL;
 5
 6    // Allocate a page for the page directory
 7    if (!(p = page_alloc(ALLOC_ZERO)))
 8        return -E_NO_MEM;
 9
10    p->pp_ref++;
11
12    e->env_pml4e = page2kva(p); // entry should be a virtual address
13    e->env_cr3 = page2pa(p);
14
15    // NPMLENTRIES: the num of pml4 entries
16    for (i = PML4(UTOP); i < NPMLENTRIES; i++)
17	    e->env_pml4e[i] = boot_pml4e[i];
18
19    // UVPT maps the env's own page table read-only.
20    // Permissions: kernel R, user R
21    e->env_pml4e[PML4(UVPT)] = e->env_cr3 | PTE_P | PTE_U;
22
23    return 0;
24}
Env page allocate helper
為了方便我們分配 physical address 到指定的 virtual address,我們實作一個 helper: region_alloc 來達成目的。
 1static void
 2region_alloc(struct Env *e, void *va, size_t len)
 3{
 4    void *start = ROUNDDOWN(va, PGSIZE);
 5    void *end = ROUNDUP(va + len, PGSIZE);
 6    for(; start < end; start += PGSIZE) {
 7        struct PageInfo *pp = page_alloc(0);
 8        if (pp) {
 9            pp->pp_ref++;
10            int ret = page_insert(e->env_pml4e, pp, start, PTE_W | PTE_U);
11            if (ret < 0) {
12                panic("region_alloc: %e \n", ret);
13            }
14        } else {
15            panic("region_alloc: failed to allocate a page \n");
16        }
17    }
18}
Read a program content for user mode
因為目前 Lab 3 階段的 JOS 還沒有 file system 支援,所以是藉由切換到 user mode 後,直接執行指定 program 的方式來驗證其正確性。而為了實現此驗證方式,我們需要讀取 JOS 已經事先準備好的 program ELF ,接著把 ELF 內的相關資訊放入 Env env_tf。
在實作之前,要先了解如何讀取 program header 內容,以取得 program segment。
Program header
The program header table tells the system how to create a process image.
參考 Executable and Linkable Format,找到需要資料的對應位置,其中包含:
e_phoff- Program header table 位置e_phnum- Program header table 的 entry 數量program_header->p_memsz- segment 在 memory 佔用的大小program_header->p_va- virtual address of segmentprogram_header->p_offset- segment 在 file image 的位置program_header->p_filesz- segment 在 file system 佔用的大小
The difference between
p_memszandp_fileszFor the PT_LOAD entry describing the data segment, the p_memsz may be greater than the p_filesz. The difference is the size of the .bss section which is not required to be stored on disk.
根據 program header 的資訊,我們就可以來實作 Lab 3 的 load_icode。主要流程:
- 從 ELF 中取得 program segment 數量
- 根據每個 segment 所需空間來分配適當的記憶體
- 把 segment 內容從 file image 複製到指定的 memory address (program_header->p_va)
- 建立 stack 記憶體空間供 user program 使用
- 將 Env 的 RIP(instruction pointer) 指向 ELF entry
這邊有個地方要特別注意,就是在執行複製的時候,需要將當前 pml4 page table 切換成 Env 的 pml4 page table,原因是我們使用 region_alloc 來為指定的 Env pml4 分配 program_header->p_va 的 page,不過當前的執行環境卻是使用 boot_pml4 table,如果我們不切換成 Env pml4 的話,那麼在 memmove 和 memset 階段就會出錯,因為找不到 program_header->p_va 配置。
e_entry
The virtual address to which the system first transfers control, thus starting the process.
 1void load_icode(struct Env *e, uint8_t *binary)
 2{
 3    e->elf = binary;
 4
 5    struct Proghdr *program_header, *end_program_header;
 6    struct Elf *elf = (struct Elf *) binary;
 7
 8    program_header = (struct Proghdr *) (binary + elf->e_phoff);
 9    end_program_header = program_header + elf->e_phnum;
10
11    lcr3(e->env_cr3); // Important!
12
13    for (; program_header < end_program_header; program_header++) {
14        if (program_header->p_type == ELF_PROG_LOAD) {
15            region_alloc(e, (void *) program_header->p_va, program_header->p_memsz);
16            memmove((void *) program_header->p_va, (void *)binary + program_header->p_offset, program_header->p_filesz);
17            memset((void *)program_header->p_va + program_header->p_filesz, 0, program_header->p_memsz - program_header->p_filesz);
18        }
19    }
20
21    lcr3(boot_cr3);
22
23    region_alloc(e, (void *)(USTACKTOP - PGSIZE), PGSIZE); // the stack for user space
24    e->env_tf.tf_rip = elf->e_entry;
25}
Create an env and run it
最後步驟是新建一個 Env,並且實作 kernel mode Env 切換 到 user mode Env 的流程。
 1void env_create(uint8_t *binary, enum EnvType type)
 2{
 3    struct Env *env;
 4    int ret = env_alloc(&env, 0);
 5    if (ret < 0) {
 6        panic("env_alloc: %e", ret);
 7    }
 8    load_icode(env, binary);
 9    env->env_type = type;
10}
而 JOS Env 共定義了五種狀態:
1enum {
2    ENV_FREE = 0,
3    ENV_DYING,
4    ENV_RUNNABLE,
5    ENV_RUNNING,
6    ENV_NOT_RUNNABLE
7};
因此在執行 Env 切換流程時,要確認並且調整 Env 狀態。
 1void env_run(struct Env *e)
 2{
 3    if (e->env_status != ENV_RUNNABLE)
 4        panic("the env could not run");
 5
 6    if (curenv && curenv->env_status == ENV_RUNNING)
 7        curenv->env_status = ENV_RUNNABLE;
 8
 9    curenv = e;
10    curenv->env_status = ENV_RUNNING;
11    curenv->env_runs++;
12
13    lcr3(curenv->env_cr3);
14    env_pop_tf(&(curenv->env_tf));
15}
切換 JOS Env 有兩個重要的條件:
- 改變 address space
- 復原 register 數值
其中,改變 address space 是使用 lcr3,env_pop_tf 則是負責將儲存在 Env 的 register 數值放回到 register。我們觀察一下 env_pop_tf 的行為:
 1void env_pop_tf(struct Trapframe *tf)
 2{
 3    __asm __volatile("movq %0,%%rsp\n"
 4             POPA // pop saved registers
 5             "movw (%%rsp),%%es\n"
 6             "movw 8(%%rsp),%%ds\n"
 7             "addq $16,%%rsp\n"
 8             "\taddq $16,%%rsp\n" /* skip tf_trapno and tf_errcode */
 9             "\tiretq"
10             : : "g" (tf) : "memory");
11    panic("iret failed");  /* mostly to placate the compiler */
12}
搭配 struct Trapframe format:
 1struct Trapframe {
 2    struct PushRegs tf_regs;
 3    uint16_t tf_es;
 4    uint16_t tf_padding1;
 5    uint32_t tf_padding2;
 6    uint16_t tf_ds;
 7    uint16_t tf_padding3;
 8    uint32_t tf_padding4;
 9    uint64_t tf_trapno;
10    /* below here defined by x86 hardware */
11    uint64_t tf_err;
12    uintptr_t tf_rip;
13    uint16_t tf_cs;
14    uint16_t tf_padding5;
15    uint32_t tf_padding6;
16    uint64_t tf_eflags;
17    /* below here only when crossing rings, such as from user to kernel */
18    uintptr_t tf_rsp;
19    uint16_t tf_ss;
20    uint16_t tf_padding7;
21    uint32_t tf_padding8;
22} __attribute__((packed));
其中 POPA 是將 struct PushRegs 儲存的 register 數值放回到 register,接著 movw 與 addq 的行為其實是把 stack pointer 調整到 tf->tf_rip 位置,最後使用 iretq instruction,讓指定的 instruction pointer (tf_rip) 可以被執行。
Recap
重新複習上述我們所完成的 Lab 內容:
- 在 kernel mode 新建立一個 env (process)
- 設置 env 的 address space (pml4 table)
- 根據 ELF Program header 資訊配置 env,包含 program entry point
- 切換成 env 的 address space 並還原 env 的 registers 值
- 跳轉去適當的 instruction 位置 (iret)
