
前言:
最近專案需要提供工具讓外部人員一同參與 Web App 的開發,由於我們的 Web App 已經有基本架構和開發方式,為了讓外部人員能夠更方便的 follow 架構,所以就決定使用 Schematics 來創建專屬樣板,讓協作開發人員可以迅速地建立專案用的 component page,然後他們只需要修改部分程式碼即可。
Angular Schematics
因為我們使用 Angular 框架,所以就使用 Angular Schematics 來建立樣板。Schematics 是一個改善 workflow 的工具,而透過 Angular Schematics ,我們可以模組化地調整專案現有檔案,例如在專案內新增指定檔案,或是修改既有檔案的內容等,減少手動調整 effort 和錯誤發生。
如同圖片所示,我們使用 Schematics 將要修改的部分(橘色方塊)apply 在 staging area,當所有內容調整完成,再 apply 到既有的專案中。(為什麼要有 staging area,主要是因為
Schematics 中可能有不只一個修改步驟,透過先應用在 staging area ,可以避免中間有錯誤發生,而導致直接影響到既有專案) 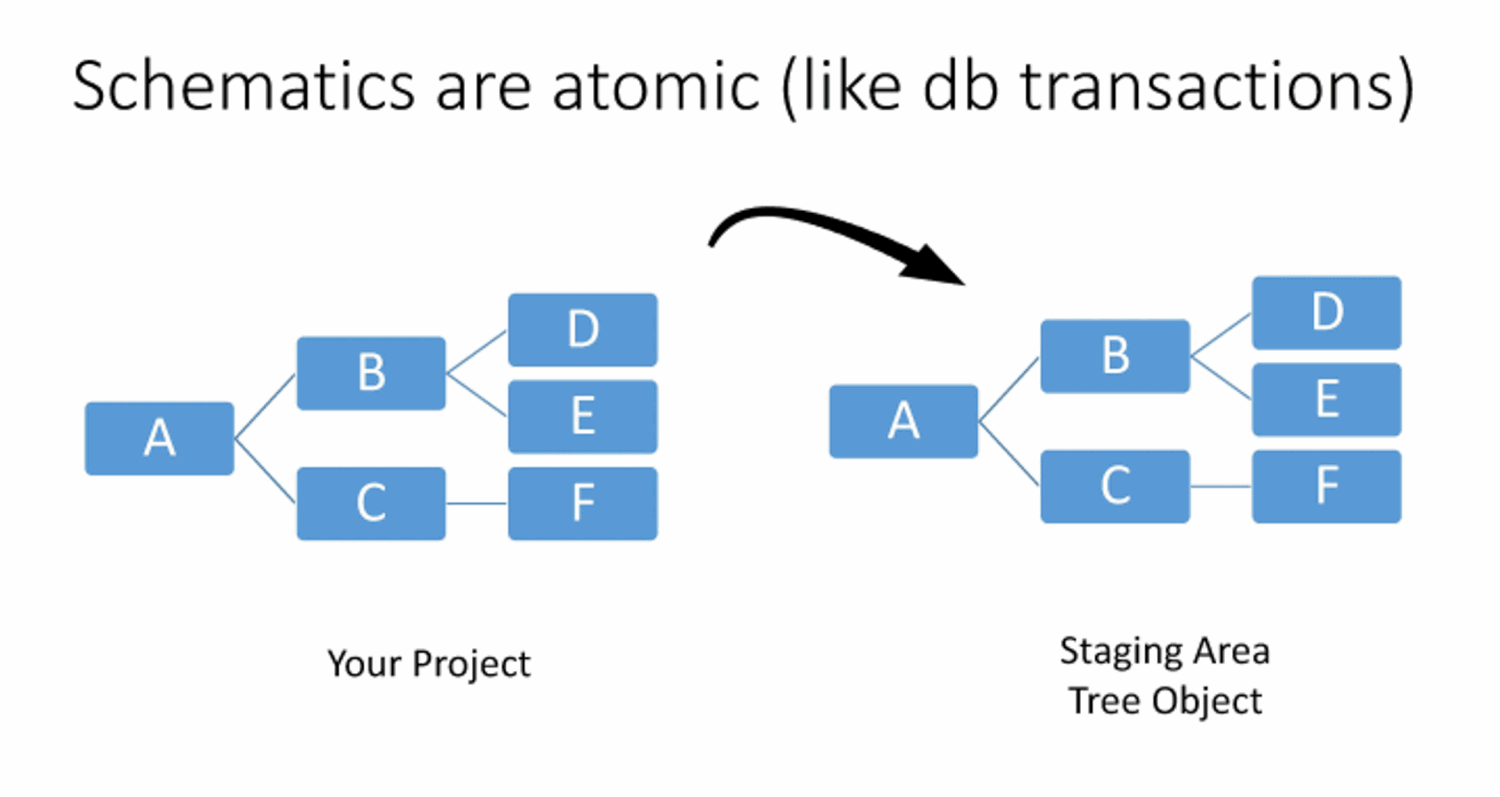 Image source:http://recurship.com/blog/2018/5/31/xfvrq9aauqkayhkd4kzp7gsbfg2bfl
以下為使用 Angular 內建的 Schematics 範例:
1ng generate component menu
2# ng - angular cli
3# generate - Angular cli 指令,後面需接 Schematics collections
4# component - Angular Schematics 內建的 collection
5# menu - collection 中規定的參數,這邊是指 component 的名稱
這樣就會快速產生出 menu component 的相關檔案。 
想知道更多 Angular 內建的 schematcis ,可參考 @schematics/angular
套用第三方 Schematics @nrwl/schematics
透過 Angular Cli 使用 Schematics 功能,不一定要使用 Angular 內建的 Schematics ,而是可以套用他人建立的 Schematics Collections。
如果有用 Nx(Nrwl Extensions for Angular),會發現預設的 Angular Schematics Collections 被替換成 @nrwl/schematics 的 Collections,即使還是使用相同的 Command 指令 ng generate component menu ,產生的檔案可能會和之前的有所不同。
而這樣的差異主要是因為 angular.json 的 defaultCollection 參數從 @schematics/angular 變成 @nrwl/schematics
1"cli": {
2    "defaultCollection": "@nrwl/schematics"
3  }
因此,透過修改 angular.json file 的 defaultCollection,你就可將任何第三方的 Schematics 設為預設。(如果沒修改 defaultCollection 也可以使用第三方 Schematics,只是在輸入指令時就必須宣告 Collections 的位置)
1# 有改變 defaultCollection 參數
2ng generate <schmatics名稱> menu
3
4# 沒有改變 defaultCollection 參數
5ng generate <schematics位置>:<schmatics名稱> menu
建立自己的 Schematics
我們可以建立自己的 schematics collections,然後透過 ng 指令來使用它。要建立 schematics collections,有幾個檔案很重要:
- collection.json - Collections 定義檔
- schema.json - Schematic 定義檔
- 實作 Schematic 的 js files
1. collection.json
一個基本的 collection.json 格式如下,一個 Collection 可以定義多組 Schematic:
 1{
 2  "$schema": "../node_modules/@angular-devkit/schematics/collection-schema.json",
 3  "schematics": {
 4    "southbound-ui": {
 5      "aliases": ["south"],
 6      "description": "A blank schematic.",
 7      "factory": "./southbound-ui/index#southboundUi",
 8      "schema": "./southbound-ui/schema.json"
 9    }
10  }
11}
$schema
規範 Collection 的結構,因為要遵守 Angular 的規則才會正確被執行,所以這個 property 的值是不會改變。或是你會看到有人這樣寫:
1{
2  "extends": ["@schematics/angular"],
3  "schematics": {
4  }
5}
extends 原有 Angular $schema 的設定。
schematics
此 property 是定義 schematic 的內容,例如 schematic 的名稱,以及 schematic 結構等,例如以下寫法:
1"southbound-ui": {
2  "aliases": ["south"],
3  "description": "Create a southbound ui",
4  "factory": "./southbound-ui/index#southboundUi",
5  "schema": "./southbound-ui/schema.json"
6}
southbound-ui(Required) 代表 Schematic 的名稱,所以在 Command line 可以下ng g southbound-uialiases是別名,在 Command line 可以改下ng g southdescription是描述 Schematics 的用途factory(Required) 這是標示實作 Schematics 的function。例如./southbound-ui/index#southboundUi就是 function 位於 index 檔案, function 名稱是 southboundUischema(Required) 是代表 Schematic 的結構,例如ng g south --name=Test,--name就是在 schema 檔案定義。
3. schema.json
前面提到,schema.json 定義了 Schematic 的結構,其例子如下:
 1{
 2  "$schema": "http://json-schema.org/schema",
 3  "id": "southbound-ui",
 4  "title": "ThingsPro Southbound UI",
 5  "type": "object",
 6  "properties": {
 7    "path": {
 8      "type": "string",
 9      "format": "path",
10      "description": "The path to create the component."
11    },
12    "name": {
13      "type": "string"
14    },
15    "url": {
16      "type": "string"
17    }
18  }
19}
其中最重要的 properties,這個屬性定義出可以讓使用者修改的參數,例如上面例子,那使用者就可以透過 --url=/src/app 來設定 url 的數值。
Tips
這邊有個小技巧,如果不想要使用 --url 這個方式來獲得使用者輸入的數值,可以改寫 schema.json 為:
1 "url": {
2  "type": "string",
3  "description": "The url.",
4  "$default": {
5    "$source": "argv",
6    "index": 0
7  }
8},
這樣使用 Commnad line ng generate southbound-ui /src/app 系統就會自動抓取 Schematics 名稱後方第一個數值作為 url 的值了。
3. 實作 Schematic 的 files
以上定義好 Schematic ,那最後就是要來實作它。以下為一個簡單的實作範例:
 1import { Rule, apply, url, template, move, branchAndMerge, chain, mergeWith } from '@angular-devkit/schematics';
 2import { normalize } from '@angular-devkit/core';
 3import { dasherize, classify } from '@angular-devkit/core/src/utils/strings';
 4import { schemaOptions } from './schema';
 5
 6//這邊的 options  就是 schema.json 中定義的 properties。在執行 Schematics 時,系統會將使用者輸入的設定,轉成一個 object 放入 function 中。
 7export function southboundUi(options: schemaOptions): Rule {
 8
 9  // Angular 內建的 string 方法,可以將使用者輸入的字串改寫成其他形式
10  const utils = { dasherize, classify };
11
12  // 如果使用者有設定 `--path` 的數值,則套用該數值,沒有的話就使用 default 'src/app/'
13  options.path = options.path ? normalize(options.path) : 'src/app/';
14
15  // 使用設定好的 template files。
16  const applyTemplate = apply(url('./files'), [
17
18    // 將 options 數值和 Angular 內建的 string 方法套用在 template files 上
19    template({
20      ...utils,
21      ...options
22    }),
23
24    // 移動到指定位置
25    move(options.path)
26  ]);
27
28  // 將行為串連起來,這些修改行為會應用在一開始有提到的 staging area,最後套用到既有專案上
29  return chain([
30    branchAndMerge(chain([
31      mergeWith(applyTemplate)
32    ])),
33  ]);
34}
Template Files
上面行為之中,有提到所謂的 Template files,這個是指可以把預設好的檔案,透過 Schematic 方式,加入到專案當中。例如,如果想要新增一個 component.ts 檔案,就可以事先在 files folder 中寫好 component.ts,當使用者在使用 Schematics 時,就會自動地在目錄中新增這些預設檔案。

那麼,將 options 數值和 Angular 內建的 string 方法套用在 template files 上這又是什麼意思呢?
仔細看上方 template file 的檔案名稱 __name@dasherize__.compoennt.ts,其中 name 就是 options 中的 name 參數, dasherize 指的則是 dasherize function,所以:
1apply(url('./files'), [
2  template({
3    ...utils,
4    ...options
5  })
6]);
的意思就是,將這些 options 參數和 functions 使用在 template file 中。如此一來,透過改寫,原先的 __name@dasherized__.compoennt.ts 就會變成 my-name.component.ts (使用 –name=“myName”)
在專案中使用自定義的 Schematics (測試)
Example:
├── @ysSchematics
|   └── package.json
|   └── src
|   |   └── collection.json
|   |   └── southbound-ui
├── libs
├── src
├── package.json
- 在自定義的 Schematics folder 中使用
npm link(範例為:@ysSchematics folder),記得要加 package.json 歐! - 跳回到專案根目錄,使用
npm link @ysSchematics - Command line 輸入
ng generate @ysSchematics:southbound-ui
如此一來,就可以看到你實作的 Schematics 被正確地套用在專案上了。